Thursday, March 31, 2011

Hippo Cupcakes


Need a entertaining idea for a child's party or maybe just for fun?  I made a few of these enchanting Hippo cupcakes the other day.  I found the design in the "What's New, Cupcake?" by Karen Tack & Alan Richardson.  This book is filled with lots of cute cupcake ideas.

Items needed

4 favorite cupcakes
4 Nutter Butter sandwich cookies
16 pieces cereal (fruit loops, cheerio's) etc.
1 cup vanilla frosting
candy or mini chocolate chips for eyes


Attach the cereal pieces to the cookie to make the ears and nose with frosting.  Pipe dots of frosting onto the cookie for the eyes and attach the candy pieces.  Frost the cupcake.  Press the completed hippo head into the frosting of each cupcake allowing it to hang over the edge slightly and voila! Delightful hippos to join your party.

Wednesday, March 30, 2011

"Giveaway" Curling Iron Holder & $10 gift card-closed


Giveaway open from March 28 through March 31, 2011
This blog is giving away a Curling Iron Holder & a $10 gift card to Michaels


Leave a separate comment for each entry with an email address. There are 6 ways to enter.

  1. Follow me through Google Connect Friends (on right side of page).
  2. Follow me through Networked Blogs (on right side of page).
  3. "LIKE" me on Facebook.
  4. Grab my button (on right side of page).
  5. Subscribe to my blog (on right side of page under "subscribe").
  6. Blog about this giveaway with a link back to my site (be sure to post your link here so I know where to find it)...you can do this on your blog, twitter or facebook pages.
And please remember to vote for my blog on the Mom blogs,
 Picket Fence Blogs (once daily)
and on The Top Mommy Blogger network
Giveaway ends 3/31.   US entries only. 

Winners will be selected at random and announced 4/04


These giveaway prizes are being provided at the blog owners expense. It is not sponsored in any way.

Tuesday, March 29, 2011

Crocheted Easter Basket

Front view

Back view

MATERIALS: White worsted weight yarn and a second color of your choice
GAUGE: crochet hook size G
PATTERN:
Bottom
Row 1: Ch 4, work 15 dc in first ch, join with sl st in the top of ch 4. total 16 dc
Row 2: Ch 3 (counts as first dc) work 1 dc in first dc, work 2 dc in ea st around. Join with sl st in the top of ch 3.  total 30 dc
Row 3: Ch 3 (counts as 1 dc), *work 2 dc in first st, 1 dc in next st, rep from * around row. join with sl st in the top of ch 3. total 45 dc
Row 4:  Ch 3 (counts as 1 dc), work 1 dc in first st, 2 dc in next st, *1 dc in next two st, 2 dc in next st, rep from * around row. join with sl st in the top of ch 3. total 60 dc
Row 5:Ch 3 (counts as 1 dc), dc in next 2 st, 2 dc in next st, * 1 dc in next 3 st, 2 dc in next st, rep from * around. total 80 dc
Row 6: With different color, *3 dc in same st, sc in next st, rep from * around row. Jn with sl st in top of ch 3.

Basket 
Row 1: Attach white to sc sp. ch 4 *dc in next st, ch 1, rep from * around. jn with sl st in top of ch 3.
Row 2: Ch 3, *dc in next st, ch 1, rep from * around. jn with sl st in top of ch 3.
Row 3- 9: repeat row 2.
Row 10: *3 dc in same st, sc in next st, rep from * around. jn with sl st in top of ch 3.

Ears
Row 1: Ch 22, working in front loop only, sc in ea st across to the last st.  Work 2 stitches in the last st on row. Turn, work in the back loop and sc in ea st across. Ch 3, turn
Row 2: 1 dc in ea st around.

Handle
Row 1: Ch 63, dc in 4th ch from hk, dc in ea st across. Ch 3 turn.
Row 2: dc in first st *ch 1, skip next st and dc in next st, rep from * across row.  Ch 3, turn.
Row 3: dc in ea st across.

Make a pom-pom for the head, tail and feet.  Use a pom-pom for the nose, and purchase googly-eyes, whiskers and small bowl for the inside of the basket.  Sew handle and ears to the basket. Glue bowl inside. Sew pom-pom in place. Afix the eyes, whiskers and nose. I weaved a sparkly gold pipe cleaner through the handle and around the basket, but that's up to you.


Abbreviations:
beg=beginning
ch=chain
ch3-sp=chain 3 space
dc=double crochet
hk=hook
lp=loop
rep =repeat
sc=single crochet
sk=skip
sl st=slip stitch
st=stitch
tch=turning chain


Crafts2u Online Crafts Superstore

Monday, March 28, 2011

Giveaway Ribbon Flower Pin & $10 gift card-closed


I had this giveaway scheduled for last week but somehow life interfered!  So I had to push it out a week. 


Giveaway open from March 28 through March 31, 2011
Today's giveaway is a Ribbon Flower Pin & a $10 gift card to Jo-Ann Fabrics and Crafts


Leave a separate comment for each entry along with an email address. There are 6 ways to enter.

  1. Follow me through Google Connect Friends (on right side of page).
  2. Follow me through Networked Blogs (on right side of page).
  3. "LIKE" me on Facebook.
  4. Grab my button (on right side of page).
  5. Subscribe to my blog (on right side of page under "subscribe").
  6. Blog about this giveaway with a link back to my site (be sure to post your link here so I know where to find it)...you can do this on your blog, twitter or facebook pages.

And please remember to vote for my blog on the Mom blogs,
 Picket Fence Blogs (once daily)
and on The Top Mommy Blogger network
Giveaway starts today 3/28 and end 3/31.   US entries only. 

Check back on Wednesday for another great prize.
Winners will be selected at random and announced 4/04


These giveaway prizes are being provided at the blog owners expense. It is not sponsored in any way.

Tuesday, March 22, 2011

Blogger Stylish Award


A huge thank you to Stephanie at Henry Happened for giving me a Stylish Blogger Award! You can't imagine my surprise when I read I had received this.  Thanks again Stephanie!  It is very much appreciated.

To accept this award the recipients are asked to do a few things.

1. Thank and link back to the person who gave you this award.

2. Share 7 things about yourself

3. Award 10-15 blogs you feel deserve the award

4. Contact these bloggers and let them know about the award.

First off, I not sure I can really think of seven things about myself but I'll try.

  1. I have two beautiful little granddaughters whom I LOVE very much.
  2. I'm a member of the Romance Writers of America.  I love reading and writing--especially romance novels.
  3. Several years ago, I wanted to open my own gourmet dog treat bakery. I was going to name it the The Barkery.
  4. I'm a shopaholic.  Phew! There I said it.  I go shopping almost every day during my lunch hour.  Retail therapy is a great way to undo the stresses of the day.  I'm not sure my husband appreciates it much, but hey, you have to do whatever works...
  5. I'm addicted to my DVR.   I think it's the best thing to come along since sliced bread.  Now I never miss an episode of The Real Housewives or The Bachelor. You gotta love that!
  6. I'm of Irish descent.
  7. I have the most AMAZING daughter ever. 
    I would like to pass this award on to 10 stylish blogs that I've recently discovered:


    happyhealthyfamilies


    Visualized By Christy


    The Girlz Korner
    Imagination Cafe Blog
    Healthy Housewife Files
    Waiting in My Wings

    Tuesday, March 15, 2011

    Filled Holiday Sugar Cookies

    SugarCookie_zps074c6bb1 photo SugarCookie_zps074c6bb1-1_zps2eba72c0.jpg

    It took me awhile to get this posted. I made these cookies about a month ago for Valentine's Day and gave them away for gifts to my children and granddaughters.  Everyone loved them.  :)

    Ingredients

    • 2-1/2 cups butter, softened
    • 2 cups sugar
    • 2 eggs
    • 1/4 cup milk
    • 2 teaspoons vanilla extract
    • 8 cups all-purpose flour
    • 4 teaspoons baking powder
    • 1 teaspoon salt
    • colored sprinkles
    Directions

    1. Cream together butter and sugar in a large bowl.
    2. Add milk, vanilla and eggs.
    3. Combine the flour, baking powder and salt; gradually add to the creamed mixture, beating just until combined.  Stir in colored sprinkles for a more festive look.  Cover and refrigerate for at least one hour to make rolling easier.

    4. On a lightly floured surface, roll out dough to 1/4" thickness.  Cut out desired shapes.

    5. Place 2" apart on ungreased or parchment lined baking sheet. Leave plain to frost after baking or sprinkle with colored sugar.
    6. Bake at 375 degrees for 8-10 minutes or until the bottoms are golden brown.  Remove to wire racks to cool.


    Yield: depending on the size of your cutter about 4 dozen.  I used two cookies and filled them with Italian Buttercream

     You can find the recipe here:  Italian Buttercream


    Then I frosted them and sprinkled a little colored sugar on them just to make them look festive.  Yummy! 


    POST-Divider NAME


    Monday, March 14, 2011

    Crocheted Hot Pads


    MATERIALS: Yarn color of your choice.


    GAUGE: Size G crochet hook

    CH 30, 3sc in second ch from hook. 
    1.  1 sc in each ch across, working in the front loop only.  3 sc in last sc.

    2.  Working in the back loop work 1 sc across to the beg. sc.  Sl st in beg. sc.

    3.  Sc in ea st around until the corners fold in on themselves.


     Finish off leaving a long tail to stitch closed.  Weave the opening closed.


    Abbreviations:

    beg=beginning
    ch=chain
    sc=single crochet
    sl st=slip stitch
    st=stitch

    Sunday, March 13, 2011

    Monday, March 7, 2011

    Let Your Sham Rock!


    Spring must be getting close.  I have the remodeling bug bad.  I really want to start a new home project, however, since we (my husband & I) already have so many underway that are not complete--alas I have to be content to just do a little remodeling around here.  I hope you'll take the time to leave me your thoughts on my blog's new look.  The blog design is courtesy of Shabby Blogs and my new graphics are from Free Pretty Things For You  Everything is free at these two sites.  Thanks for your service. I love my new look.

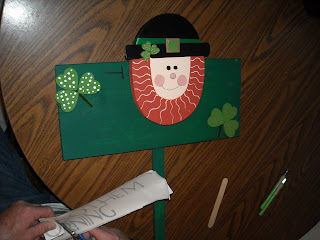
    Sunday was our family craft day.  Courtney, Amber and I got together to make us a little St. Patrick's day lawn sign.  I think they turned out pretty cute.  What do you think?
    Materials list:
      Paint list
    • Autumn Leaves
    • Metallic Sahara Gold
    • Santa's Flesh
    • Pink Angel
    • Wicker White
    • Grass Green
    • Hunter Green
    • Green Forest
    Wooden Oval for face 9"
    Piece of wood 7" x 16" (of desired size)
    Paint stir for hat brim
    Green ribbon
    Sharpie marker (black)
    pencil
    glue gun
    6 2"x2" hearts (shamrocks on sign)
    3 1"x1" hearts (shamrocks of hat)
    1 5/16" button (for nose)
    pipe cleaner (green or brown--shamrock stem)
    vinyl (for lettering)
    Cricut machine


    Various wooden pieces needed.  My husband used a paint stirrer stick for the hat band and then a cut a small square from the end for the buckle.  I had him keep the end that dipped in because I liked it.  I thought that would make a good spot to put the shamrock on the hat. 


    Wooden pieces laid out prior to painting.

    Paint the following pieces and allow to dry before adding a second coat.  
    1. Sign green forest.  Hearts grass green.  Decorate the hearts as you wish.  We all did our different.   
    2. The hat band black.  The inside of the buckle grass green and and the outside stripe with the metallic gold.  Remember to add the little stud that comes through the hole. 
    3. The top of the oval needs to be based in black. Inside of the oval paint with Santa's flesh and use the Autumn leaves for the beard on the outside edge.  Paint the nose piece pink angel. Also use the pink angel for the cheeks.  Black for the eyes and Autumn leaves for the eyebrows if you choose to put them on.
    4. Use Santa's flesh for the wavy lines in the beard.  And a black sharpie marker for the detail on the buckle, around the beard and shamrocks.
    5. Secure the oval in the middle of your sign with hot glue.  Add a strip of green ribbon for the hat band. With hot glue, secure the brim of the hat just below the hat band.  Glue the buckle into place on the hat band.  Make your shamrock from the 3 small hearts and secure to the hat band.
    6. Glue the nose into place.
    7. Make shamrocks from the 6 larger hearts and glue into place on the sign.  Add a stem with the pipe cleaners.
    8. Using the Cricut machine, cut your words out of the vinyl.  Place them on your sign.
    9. Using a clear coat varnish, spray the entire sign to protect it from the weather.
    10. Tie a cute bow around the stake of the sign.


    Mine


    Amber's


    Courtney's

    Finished project!

    Friday, March 4, 2011

    Fashionable Hair pins


    I love hair pins.  For both adults and children.  Here's a quick way to make inexpensive fashionable hairpins for you, your child, or just to give away as a fun, easy gift.

    Materials:
    Brads/Cute embellishments
    Decorative bobby pins
    Felt
    Paint
    Paint brush
    Needle nose pliers
    Wire cutters
    Hot glue gun
    Scissors

    Instructions:


    Select the brad for your hairpin.  Trim the metal tacks on the back of the brads and flatten the remaining pieces.


    Cut a small circle of felt.  Insert between the hairpin.  Place some hot glue on the felt.


    Place the flattened brad onto the hot blue and press, holding securely for a second or two.  Let dry. 

    Adorable hairpins!