Spring must be getting close. I have the remodeling bug bad. I really want to start a new home project, however, since we (my husband & I) already have so many underway that are not complete--alas I have to be content to just do a little remodeling around here. I hope you'll take the time to leave me your thoughts on my blog's new look. The blog design is courtesy of
Shabby Blogs and my new graphics are from
Free Pretty Things For You Everything is free at these two sites. Thanks for your service. I love my new look.
Sunday was our family craft day. Courtney, Amber and I got together to make us a little St. Patrick's day lawn sign. I think they turned out pretty cute. What do you think?
Materials list:
Paint list
- Autumn Leaves
- Metallic Sahara Gold
- Santa's Flesh
- Pink Angel
- Wicker White
- Grass Green
- Hunter Green
- Green Forest
Wooden Oval for face 9"
Piece of wood 7" x 16" (of desired size)
Paint stir for hat brim
Green ribbon
Sharpie marker (black)
pencil
glue gun
6 2"x2" hearts (shamrocks on sign)
3 1"x1" hearts (shamrocks of hat)
1 5/16" button (for nose)
pipe cleaner (green or brown--shamrock stem)
vinyl (for lettering)
Cricut machine
Various wooden pieces needed. My husband used a paint stirrer stick for the hat band and then a cut a small square from the end for the buckle. I had him keep the end that dipped in because I liked it. I thought that would make a good spot to put the shamrock on the hat.
Wooden pieces laid out prior to painting.
Paint the following pieces and allow to dry before adding a second coat.
- Sign green forest. Hearts grass green. Decorate the hearts as you wish. We all did our different.
- The hat band black. The inside of the buckle grass green and and the outside stripe with the metallic gold. Remember to add the little stud that comes through the hole.
- The top of the oval needs to be based in black. Inside of the oval paint with Santa's flesh and use the Autumn leaves for the beard on the outside edge. Paint the nose piece pink angel. Also use the pink angel for the cheeks. Black for the eyes and Autumn leaves for the eyebrows if you choose to put them on.
- Use Santa's flesh for the wavy lines in the beard. And a black sharpie marker for the detail on the buckle, around the beard and shamrocks.
- Secure the oval in the middle of your sign with hot glue. Add a strip of green ribbon for the hat band. With hot glue, secure the brim of the hat just below the hat band. Glue the buckle into place on the hat band. Make your shamrock from the 3 small hearts and secure to the hat band.
- Glue the nose into place.
- Make shamrocks from the 6 larger hearts and glue into place on the sign. Add a stem with the pipe cleaners.
- Using the Cricut machine, cut your words out of the vinyl. Place them on your sign.
- Using a clear coat varnish, spray the entire sign to protect it from the weather.
- Tie a cute bow around the stake of the sign.


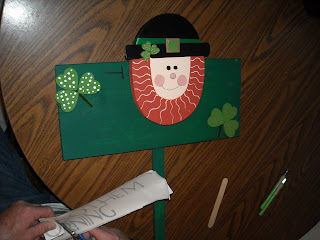

Mine
Amber's
Courtney's
Finished project!


-1.jpg)